In modern industrial manufacturing and quality control, the surface integrity and durability of coatings are key indicators of product quality. Whether applied to automotive bodies, wooden furniture, electronic product housings, or architectural decorative materials, paint films serve not only an aesthetic and decorative purpose but also provide essential protection against external physical damage. As a professional testing instrument, the paint film scratch tester simulates scratching behavior under everyday use or extreme conditions, providing objective and quantitative data on the scratch resistance of materials. It has become an indispensable tool for coating research and development, production quality inspection, and third-party testing laboratories.
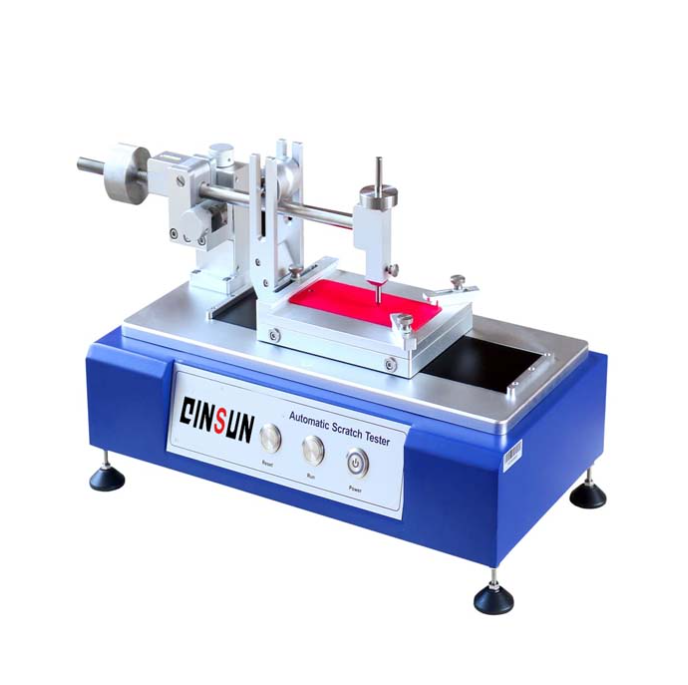
The paint film scratch tester is designed to reproduce the scratching behavior caused by sharp objects on material surfaces during everyday use. Its operating principle is based on controlled mechanical movement: a standardized stylus with a specific geometry, such as a hemispherical or conical tip, typically made of diamond, tungsten carbide, or hardened steel, moves across the sample surface at a constant speed under a precisely controlled vertical load.
This test is far more sophisticated than simply scratching a surface. A precision drive system, such as a servo motor combined with a ball screw or a high-torque gear reduction mechanism, ensures that the stylus maintains a highly consistent travel speed under different loads.
Some advanced instruments also incorporate an electrical conductivity detection circuit. When the stylus penetrates the insulating paint film and contacts the underlying metal substrate, the circuit is completed and a signal is triggered. This enables automatic identification of the coating failure point, eliminating subjective errors associated with visual inspection.
1.Preparation Before Testing
Sample Preparation
Ensure that the paint film specimen has a flat surface free from oil, contaminants, and impurities, and that it has been fully cured according to the curing conditions specified in the applicable paint film product standard.
If the specimen is a flat panel, secure it firmly to the instrument's sample stage to prevent movement during testing. For rolled materials or curved specimens, adjust the fixation method according to the compatibility and capabilities of the instrument.
Instrument Inspection and Adjustment
Inspect the scratching tool, such as a diamond stylus or steel needle, to ensure that it is intact and that its tip is free from wear or damage. Replace it when necessary with a tool conforming to the specifications required by applicable standards, such as ISO 1518 or ASTM D7027.
Calibrate the loading system using standard weights or the instrument's built-in calibration function to ensure that the applied loads, such as 50 g, 100 g, or 500 g, are accurate.
Adjust the scratching speed according to the applicable testing standards, such as GB/T 9279 or ISO 1518. The typical scratching speed is 10–60 mm/min. Check that the transmission system operates smoothly.
Clean the instrument worktable and scratching path to prevent impurities from affecting the test results.
2.Testing Procedures
Sample Placement
Place the prepared specimen securely on the sample stage. Ensure that the test area is directly beneath the scratching stylus and that the scratching path is unobstructed.
Test Parameter Configuration
Load: Select an appropriate load according to the expected scratch resistance of the paint film. Testing may begin with a low load and gradually increase, or the load may be set directly according to the applicable product standard.
Scratch Length: Set the length of a single scratch, typically 5–100 mm, with 10 mm or 30 mm commonly used in standard testing procedures.
Scratch Speed: Set the scratching speed according to the applicable standard or testing requirements to ensure that the stylus moves uniformly across the paint film surface.
Number of Repetitions: If multiple tests are required, such as testing at different loads or locations, configure the number of repeated scratches and the spacing between them to prevent interference between adjacent scratches.
Scratch Testing
Start the instrument. The scratching stylus moves along the predefined path across the paint film surface under the specified load and speed.
During testing, monitor the instrument for any abnormalities, such as sample movement or stylus jamming. If an abnormality occurs, stop the test immediately and readjust the setup.
After completing a single scratch, the stylus automatically returns to its initial position. The sample position can then be changed, or the test parameters can be adjusted for the next test.
3.Post-Test Inspection and Result Evaluation
Sample Inspection and Recording
Inspect the scratched surface visually or under a microscope, typically at magnifications of 10–100×, to evaluate the damage characteristics.
Record the following observations:
Whether scratches, cracks, peeling, or substrate exposure have occurred.
The depth and width of the scratches, which can be measured using a microscope.
The degree of damage, such as classification according to the applicable evaluation criteria: Grade 0 for no visible scratching, Grade 1 for minor scratching, Grade 2 for noticeable scratching, and Grade 3 for substrate exposure.
When necessary, capture images of the scratched areas for documentation or subsequent analysis.
Instrument Cleaning and Maintenance
After testing, switch off the instrument and clean the scratching stylus and sample stage to remove residual paint film debris.
Inspect the condition of the stylus and replace it promptly if wear is detected. Restore the instrument to its initial condition and store it properly.
As consumer expectations for product quality continue to rise, the paint film scratch tester has evolved beyond being merely a laboratory testing instrument. It now serves as an important bridge between material research and practical application.Through scientific and objective testing data, the instrument helps manufacturers identify potential defects during product design and maintain strict quality control throughout production.In the future, with the integration of nanotechnology and intelligent sensing technologies, paint film scratch testing will become increasingly microscopic and intelligent, providing stronger technical support for achieving superior surface protection and enhanced coating durability.
Prev:What are the secrets behind plastic friction and wear testing machines?
Next:No more


