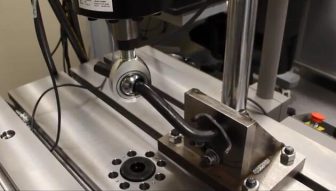
The Universal Wear Test Machine is mainly composed of control system and friction system. Install the specimen on the fixture and tighten it. Place the upper fixture with the sandpaper, adjust the position of the weight so that the sandpaper is in contact with the surface of the specimen, set the number of friction times of the specimen through the control system, and start the instrument. The lower fixture base before and after the movement, so that the sample and sandpaper friction with each other, when the number of movements to set the value of the instrument to stop, remove the sample to observe the degree of wear. It is suitable for testing the wear performance and abrasion resistance of all kinds of fabrics including clothing, shoes and industrial textiles.
Operating procedures:
(1)prepared before the test:
1. Determine the form of test friction, according to the requirements of the drawings processing samples.
2. Prepare the upper and lower specimens and the corresponding fixture.
3. According to the test requirements, the sample, the next sub-plate and fixture for cleaning.
4. Turn on the power and click "Start" to turn on the control computer.
5. Start the MMW-1A test system software.
6. Turn on the "power on", the equipment idle preheat for 10 minutes.
(2)sample clamping:
1. Put the prepared sample into the corresponding fixture, hold the fixture and sample, the taper up, into the spindle cone hole.
2. Rotate the lever at the top of the spindle with the other hand clockwise (overhead) so that the screw at the lower end of the rod is screwed into the screw hole at the top of the clamp and tighten.
3. Put the lower sample (large and small test ring) into the sub-tray seat, test ring with pin hole face down, aligned on the vice seat on the fixed pin.
4. If the heating test, the sample is installed, open the thermostat switch, plug a good temperature sensor and power plug.
5. To do the media test, the sample is installed, then the mud tank connected to the secondary plate, and pressure on the ring, in the sub-tray with the valve and close, into the media can be.
(3) start:
The pump repeatedly raised the piston, the cylinder, the tubing of the air can be observed in the oil return is continuous and stable. If the pointer is found in the test of a range of sluggish phenomenon, then the following operations: 1, select the maximum range, adjust the working pressure to half the range and stability. 2, the above operation must pay attention to: ① working pressure can not be too large; ② exhaust wire when the rotation should be gentle, beware of twist off.
(4) test:
1, the cold-rolled bearings to both sides of the equidistant to open, to move the beams do not meet when the prevail;
2, in the platen to install the ball under the pressure plate, lift the beam to move up and down about 20mm;
3, the use of full range, start the pump, close the return valve to open the valve to make plate up, slowly increase the pressure to 80% of the range;
4, check the zero error, check the tubing joints with or without oil;
5, if there is oil, unloading force after the tightening of the joints.
Five, began to test:
1. Adjust the lower deck height: counterclockwise (overlooking) Loosen the lock nut and turn the knurled screw counterclockwise to raise the lower guide spindle until there is a gap of 1 ~ 2mm between the upper surface of the test ring and the lower surface of the test specimen until.
2. Reverse lock the nut to eliminate the thread gap between the knurled screw and the upper force plate.
3. Select the friction pair, set the test force, test time, the maximum friction torque (more than the maximum alarm shutdown), spindle speed.
4. Click the test force "Clear".
5. Click the "Load" button to load the test force.
6. To measure the temperature, press the thermostat power button on the panel and plug the temperature sensor. Click the "Start Temperature" button on the main page to display the temperature in real time.
7. Click Friction "Clear"
8. Click the "Start" button, the spindle starts to rotate, and the test starts.
9. To stop midway, click the "Stop" button on the main page.
10, the experiment, the software automatically control the test force and temperature in the set value. Real-time acquisition of friction torque, the number of spindle speed, calculate the friction coefficient, showing the experimental time, the experimental temperature; to be experimental time, the test machine automatically shut down.
Six, data and curve preservation
1. At the end of the experiment, click "Save original data" to save the original data.
2, click the "curve display" button, click on "image format save", save the test curve; click "return" button to return to the main page.
3, click "Report Processing", enter the basic situation of the test, set the parameters, click "OK" button; add the header, add data, click "TXT format save" or "RTF format save" button, save the test data. Click the "Exit" button to return to the main page.
Seven, the end of the test
1. Click the "Uninstall" button on the main page, the test machine will automatically remove the test force until the page shows the limit, the uninstall automatically stops.
2. Click the "Exit" button on the main page to exit the measurement and control system.
3. After exiting the measurement and control system, loosen the lock nut and unscrew the screw shaft so that the lower guide spindle descends until there is enough space between the upper and lower specimens to remove the specimen.
4. Remove the lower specimen, loosen the lever, and tap the lever down until the clamp is loose with the spindle. Remove the fixture and the sample.
5. Observe the experimental results, do a good job of experimental records.
6. Turn off the computer, press the panel "power off" button, turn off the machine power.
Prev: Application And Common Faults Analysis Of Taber Abrasion Testing Machine
 WeChat platform on the scan
 Copyright:Qinsun Instruments Co., LTD! Qinsun Instruments Co., LTD!Provide technical support Enterprise email
